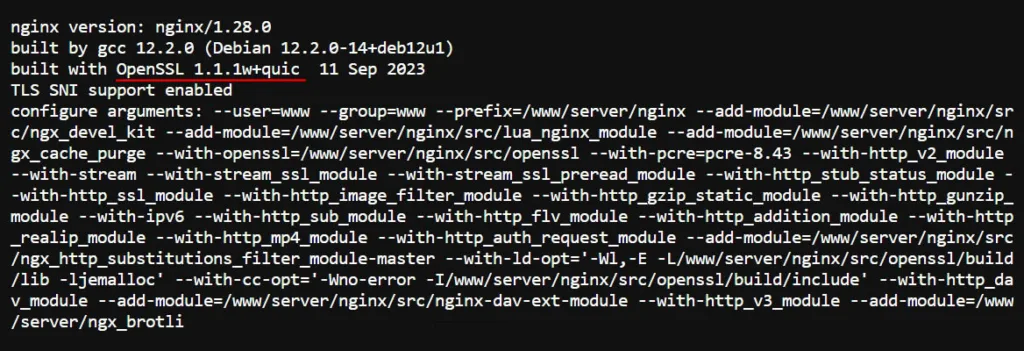
Nginx 自 1.25.0 起支持 QUIC 和 HTTP/3 协议。Nginx 官方支持文档建议使用支持 QUIC 的 SSL 库(如 BoringSSL、LibreSSL 或 QuicTLS)来编译 Nginx。否则,将使用不支持 early data 的 OpenSSL 兼容层。当前宝塔面板的 Nginx 安装脚本中采用的是 OpenSSL 1.1.1w,为提升 QUIC 和 HTTP/3 的性能与稳定性建议用 QuicTLS 替换。
内容
- 前言
- 准备安装脚本
- 修改编译安装脚本
- 执行编译安装脚本
- 其它注意事项
前言
本教程适合使用宝塔面板安装 Nginx 且需要启用 QUIC 和 HTTP/3 协议的用户。Nginx 版本推荐选择 1.28 +,修复了大量与 HTTP/3 相关的 Bug。
QuicTLS 建议选择 1_1_1w-quic 或以上版本(匹配宝塔的原 OpenSSL 1.1.1w)。 QuicTLS 是 OpenSSL 的完整分支,此分支添加了可供 QUIC 实现用于连接握手的 API。
准备安装脚本
检查当前 Nginx 使用的 OpenSSL 版本:
nginx -V
下载宝塔最新的 Nginx 编译安装脚本
cd /www/server/panel/install
wget https://dg2.bt.cn/install/3/nginx.sh -O nginx_quictls.sh
修改编译安装脚本
编辑 nginx_quictls.sh 文件,找到如下内容(大约从301行起):
    if [ -z "${GMSSL}" ]; then
        TLSv13_NGINX=$(echo ${nginxVersion} | tr -d '.' | cut -c 1-3)
        if [ "${TLSv13_NGINX}" -ge "115" ] && [ "${TLSv13_NGINX}" != "181" ]; then
            opensslVer="1.1.1w"
        else
            opensslVer="1.0.2u"
        fi
        # if [ "$version" == "1.23" ];then
        #     opensslVer="3.0.5"
        # fi
        wget -O openssl.tar.gz ${download_Url}/src/openssl-${opensslVer}.tar.gz
        tar -xvf openssl.tar.gz
        mv openssl-${opensslVer} openssl
        rm -f openssl.tar.gz
    else
        wget -O GmSSL-master.zip ${download_Url}/src/GmSSL-master.zip
        unzip GmSSL-master.zip
        mv GmSSL-master openssl
        rm -f GmSSL-master.zip
    fi
替换成:
#用 quictls 替换 openssl

# 删除原有的 git clone 代码,替换为手动解压本地 ZIP 文件
if [ -f "/www/server/panel/install/openssl-OpenSSL_1_1_1w-quic.zip" ]; then
    echo "正在解压本地 OpenSSL (QUIC) 源码..."
    unzip -q /www/server/panel/install/openssl-OpenSSL_1_1_1w-quic.zip -d ${Setup_Path}/src/
    mv ${Setup_Path}/src/openssl-OpenSSL_1_1_1w-quic openssl
else
    echo "错误:未找到 /www/server/panel/install/openssl-OpenSSL_1_1_1w-quic.zip"
    exit 1
fi

cd openssl
./config
make -j$(nproc)
cd ..  # 返回到 ${Setup_Path}/src,为后续 Nginx 编译准备
注意以上脚本考虑到国内主机访问 GitHub 仓库受限的问题,为避免安装失败,先下载 openssl-openssl-1.1.1w-quic.zip,并上传至 /www/server/panel/install 目录中。
如果确认服务器访问 Github 没问题,可以使用以下脚本直接从 GitHub 仓库获取源码,还可以用 git clone -b 指定版本。
# 用 quictls 替换 openssl

echo "正在克隆 QUIC-TLS(基于 OpenSSL )源码..."
rm -rf ${Setup_Path}/src/openssl  # 确保旧目录不存在
cd ${Setup_Path}/src/
git clone https://github.com/quictls/openssl.git
cd openssl

./config
make -j$(nproc)
cd ..  # 返回到 ${Setup_Path}/src,为后续 Nginx 编译准备
然后修改 Nginx 的编译参数,在 nginx_quictls.sh 文件中找到如下代码:
./configure --user=www --group=www --prefix=${Setup_Path} ${ENABLE_LUA} --add-module=${Setup_Path}/src/ngx_cache_purge ${ENABLE_STICKY} --with-openssl=${Setup_Path}/src/openssl --with-pcre=pcre-${pcre_version} ${ENABLE_HTTP2} --with-http_stub_status_module --with-http_ssl_module --with-http_image_filter_module --with-http_gzip_static_module --with-http_gunzip_module --with-ipv6 --with-http_sub_module --with-http_flv_module --with-http_addition_module --with-http_realip_module --with-http_mp4_module --with-http_auth_request_module --add-module=${Setup_Path}/src/ngx_http_substitutions_filter_module-master --with-ld-opt="-Wl,-E" --with-cc-opt="-Wno-error" ${jemallocLD} ${ENABLE_WEBDAV} ${ENABLE_NGX_PAGESPEED} ${ENABLE_HTTP3} ${ADD_EXTENSION} ${i_make_args} 2>&1|tee /tmp/nginx_config.pl修改成:
./configure --user=www --group=www --prefix=${Setup_Path} ${ENABLE_LUA} --add-module=${Setup_Path}/src/ngx_cache_purge ${ENABLE_STICKY} --with-openssl=${Setup_Path}/src/openssl --with-pcre=pcre-${pcre_version} ${ENABLE_HTTP2} --with-http_stub_status_module --with-http_ssl_module --with-http_image_filter_module --with-http_gzip_static_module --with-http_gunzip_module --with-ipv6 --with-http_sub_module --with-http_flv_module --with-http_addition_module --with-http_realip_module --with-http_mp4_module --with-http_auth_request_module --add-module=${Setup_Path}/src/ngx_http_substitutions_filter_module-master --with-ld-opt="-Wl,-E -L${Setup_Path}/src/openssl/build/lib -ljemalloc" --with-cc-opt="-Wno-error -I${Setup_Path}/src/openssl/build/include" ${ENABLE_WEBDAV} ${ENABLE_NGX_PAGESPEED} ${ENABLE_HTTP3} ${ADD_EXTENSION} ${i_make_args} 2>&1|tee /tmp/nginx_config.pl以上代码中添加了设置将添加到 CFLAGS 变量的附加参数(-I${Setup_Path}/src/openssl/build/include)与设置将在链接期间使用的附加参数(L${Setup_Path}/src/openssl/build/lib)。
保存修改后的 nginx_quictls.sh 文件,然后在宝塔面板的软件商店中卸载当前已安装的 Nginx。
执行编译安装脚本
卸载已安装的 Nginx 后,执行以下指令通过修改后的安装脚本执行 Nginx 编译安装。
sh nginx_quictls.sh install 1.28提示:以上指令将安装最新的 Nginx 1.28.x,如需要安装其它版本,可将 1.28 修改成 1.27 或其它(不要输入最后的一个小版本号)。
如果看到 Starting nginx… done 则说明安装成功。
然后检查当前 Nginx 使用的 OpenSSL 版本
nginx -V
其它注意事项
在使用本教程修改后的脚本安装 Nginx 之前,建议先在宝塔软件商店中安装一次 Nginx 再将其卸载掉,因为这样不会漏掉一些依赖组件的安装。
Nginx 中启用 HTTP3 需要防火墙开放 443 端口的 UDP 协议。另外宝塔开设的站点默认配置是不能支持 HTTP3 的,建议参考 Nginx 官方文档修改其配置。


![Thrive Theme v10.7.2 [+ Shapeshift] 汉化版 – WordPress 多功能主题-WP技术帮](https://www.wpjsbang.com/wp-content/uploads/2025/08/thrive-theme-1-768x388-1.webp)


暂无评论内容